Showing posts with label Home Depot Holiday. Show all posts

Wednesday, December 19, 2012

brown paper packages tied up with string...


these are a few of my favorite things!
And now you will be humming The Sound of Music all the live-long day! You're welcome!
The numbers for this little number below are from Home Depot...They're house numbers. Look at my big bad crafty self!


Now don't get me all wrong, I do love me some color. And I do love me some Christmas color. But when I saw this ginormous roll of brown paper at Home Depot, we had a love connection. I was browsing the isles of paint, flirting with some Martha Stewart glitter paint when that role of paper whistled at me. I played it cool, did a few laps around the paint counter, and casually made my way over to that paper role. And then I took him home with me...I think I may be on the naughty list now ;).

Best part...he's super cheap and wraps, like, a million gifts! Best bang for your buck!

So if you are in a bind, staring down a TON of gifts to wrap, I suggest wrapping with neutral brown paper and jazzing it up! Here are 3 different ways I accessorized my sexy brown paper gifts:

1. Glitter me pretty! Below is a little tutorial on adding glitter and glam to your wrapping...and I never turn down glitter (or glam for that matter).

1| Wrap it!
2| Create a design with glue...I used the end of a paint brush to make the dots and the hair side to make swirls and trees.
3| Glitter it! Cover all that glue in glitter.
4| Dump it...shake off all that extra glitter.


2. Yarn. Yarnny yarn yarn. Sting's big-boned cousin...yarn. Oh I do love yarn, and I love the little pom-pom yarn balls as much as the next girl! I used this tutorial to make my snowball-reminiscent poms.

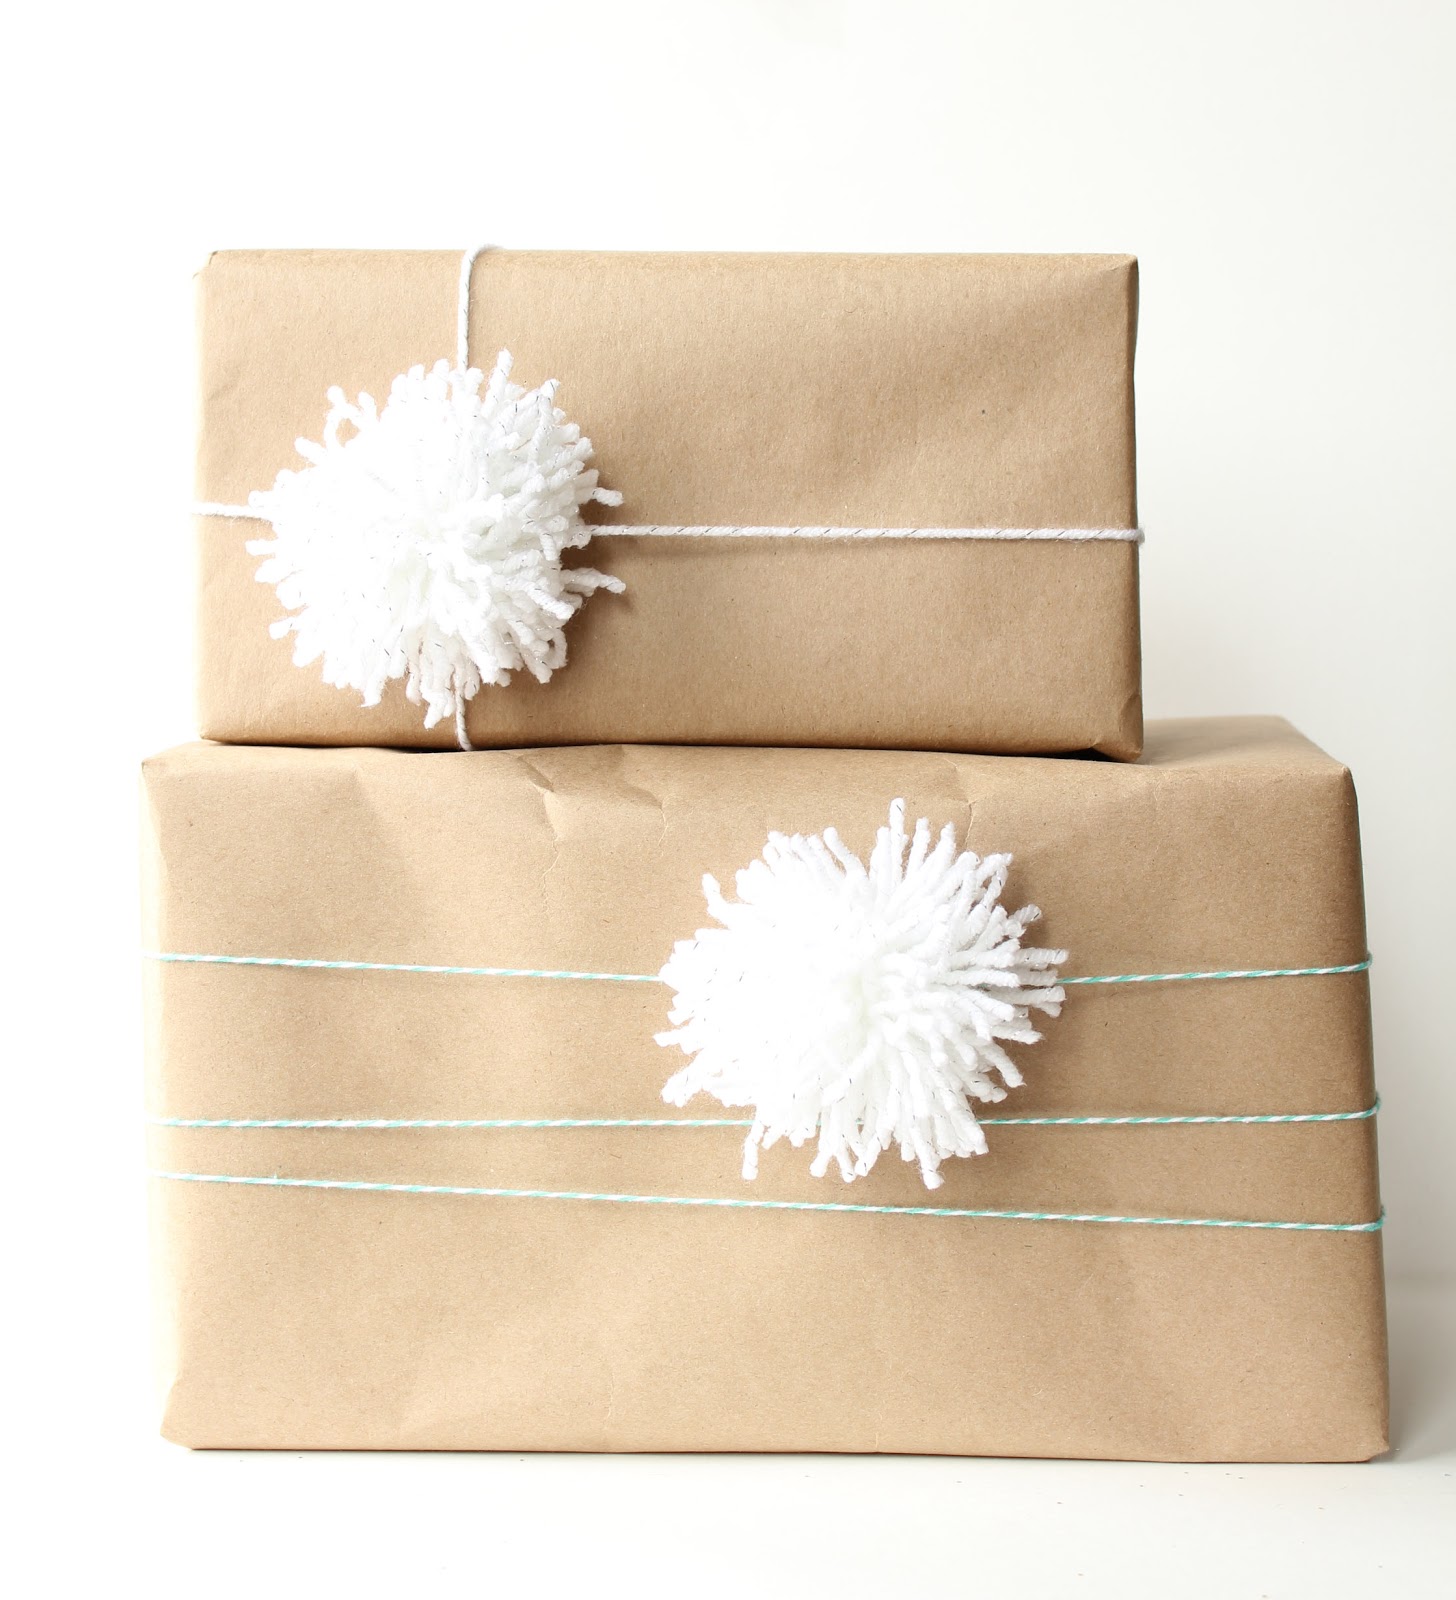
3.  Keep it neutral...why mess with a good thing? Like the brown package itself, twine adds a simple touch that can't be beat (unless you use glitter ;) ).


And remember...perfection is not the goal! So have fun with it. Go wild! It's just going to be ripped to smithereens anyways! Happy wrappings!

Monday, December 10, 2012

Snow (Glitter) globes you say?

No need to fret! The Home Depot Holiday continues! Of all the crafts I have made this season, I may have the biggest craft crush on my light cover "snow globes". I say "snow globes" with "" because there isn't really any snow involved..."just" glitter (which is the greatest). I was kind of surprised by my adoration for such a craft. It's simple and teal and involves antler so I should have know it would make me weak at the knees. 

1| To do this craft...Buy yourself some small plastic toy woodland animals. I selected the North American Forests pack because it had a moose, beaver, elk, raccoon, owl, and bear and I can't say no to such an array of critters. 

2| Next I painted them all teal or white because that's what suited my fancy.

3| Then I cut Styrofoam balls in half, glued them to a painted-white canning lid (for a sturdy base). 

4| I used spray glue and a ton of glitter to cover the Styrofoam half-ball in a glittery wonderland!

5| Glue that woodland critter to the top!


6| Okay, so the secret to this craft comes from Home Depot...It's a glass light cover. It costs $2.50. You'er are shocked I know. These covers are wonders-they are really stinking cute and they can be used for tons of stuff (candle holders, toothbrush cup, or even a snowglobe cover!)


The critters are really the best...I have bunnies and buffalo scattered about and what says Christmas more than a teal buffalo?


Wednesday, November 28, 2012

Merry Mantel

 On the first day of December I woke up to a to-do list longer than my Christmas tree is tall. And I put on my big girl panties and set out to tackle that list, so help me. From one frantic activity to another I paused only to complain about how much I had to do or to rebuke Husband for not joining me in my relentless pursuit of list completion...
and then husband said something that was pretty important. Something pretty wise. He said, "could you just relax and enjoy your day and not get so stressed when you don't get everything done?"
and I was like, duh Alix, this time of year is to enjoy each other, not cross each other off a list.
don't tell him, but Husband made me realize that I need to relax...Christmas will come no matter what I do or don't get done. That special day will come whether or not I enjoy the next few merry weeks.
So enjoy I will. 
Celebrate I will. 
Be grateful for Christ, His birth, His atonement, I will. 
Sound like Yoda, I do. 

I might not get everything done that I "need" (aka "want") to do, but I did get this Holiday mantel done. and that's something worth noting. So consider it noted.


Welcome December!


The best part of this Holiday mantel, obviously, is the glitter antlers. You guys, I have been asking my Husband to get me a set of antlers for a while now and then I just decided to make some myself. 

The Materials
- mdf board >> you can find pre-cut 2'x2' boards at Home Depot!
- Teal Paint >> Glidden semi-gloss, color Floating Bubbles (who doesn't want that color in their life?)
- Gold glitter >> Hobby Lobby (or wherever)
- Elmer's liquid glue >> WalMart (or wherever)

The Design
I did antlers because antlers are usually on my mind (hence my blog title graphic), but I highly encourage experimenting with other Holiday designs (and with other colors of paint and glitter).
Some ideas I considered... 
- a snowman: 3 mdf boards hung in a vertical row, each with a glittery circle in each
- a target on one board and an arrow on the other
- a Christmas tree

The Process
1| paint the board/s teal (or color of choice) >> let dry completely
2| in pencil, sketch design on board
3| in sections, paint glue within the design (aka: the desired glittery sections)
4| sprinkle glitter on the glue
    note: it helps to glue and glitter in sections so that the glue doesn't dry before you add glitter
5| dump off excess glitter
6| mount on wall >> I used a sawtooth hanger mount (also from Home Depot), but you can use wire or just prop them up on a mantel


and an important part of this time of year is family traditions...don't forget to tell me your traditions here!!!

Check out my fall mantel here


Monday, November 19, 2012

holiday wreath DIY


My Home Depot holiday is in full throttle now!
This holiday wreath is simply lovely! And it is easy to make. And it is inexpensive.
That's a trifecta people.

Materials:
- pool noodle (that's right...a pool noodle)
- painter's drop cloth (from Home Depot of course)
- decorative items...for example, twine (Home Depot) or burlap (Home Depot) or a little bling (disco ball ornament)
- duct tape (Home Depot)
-  hot glue/hot glue gun

Got all your materials? On your mark, get set, wreath!


1| Begin by taking that pool noodle and looping it into a circle the size of the wreath you desire. Make sure to not make the loop/wreath too small because the noodle will start to bend and kink and then you wont have a circular wreath, it will be more like a triangle. So good size loop, and then mark on the noodle where you will cut

2| Next, get out the cutlery...well just one serrated-edged knife and cut right through the noodle at your mark. Make sure that it is a smooth cut so the end of the noodle will fit flush with your cut end.


3| I spent a minute or two gently working the noodle into a circular shape. It wont stick as a circle on its own, but I did work out some tough spots that felt like they might kink.


4| Now duct tape those two ends together like its your job. This is actually the hardest part and may take 3 to 4 hands instead of 2. So grab a friend. And make sure that you use LOTS of duct tape because if you don't that stubborn noodle will pop out of the tape. It's not pretty, but the more duct tape the better.


5| For the next part you will need your glue gun ready and strips of painter's drop cloth cut. Begin by placing a strip of hot glue onto the noodle. This will melt the noodle a little bit, but it is nothing to panic about. Then stick the end of your painter's drop cloth strip to the hot glue, and then start wrapping the strip around your noodle form. 


6| Continue by gluing strips of drop cloth all the way around your noodle form. If you used lots of shorter strips of cloth, make sure you start new strips where your last one ended and make sure to make the back of your wreath the side where all the strip ends meet up (so you don't have strip ends showing). Or just cut one really long strip that goes all the way around. I roughed up the strip edges (made them look stringy) by rubbing my hand around the wreath.


7| Bling it out! I used these mini ornaments and disco balls from Hobby Lobby to bling up my drop cloth wreath.

So there you have it...go get your wreath on!


Thursday, November 15, 2012

My fall mantel + garland DIY


Hello all! The Home Depot holiday quest continues! Remember how I told you in this post about how I would post about my rustic garland and such? Well that is this post yo!

This week I decorated my mantel in fall fun (I got a little ahead of myself with the advent calendar in November, but we are all amped for Thanksgiving. We really are). And it just wouldn't be a fall mantel party without inviting the garland, and let me tell you I so have a crush on this garland. So lets get to it!

My mantel sports 2 kinds of garland:
1. painter's drop cloth garland
2. gardening burlap garland

Materials-All materials for both types of garland come from Home Depot of course!:
- painter's drop cloth (painter's drop cloth is literally the canvas-like material that painters throw on the floor to prevent paint spills from ruining the floor. You can find it in the paint section of Home Depot, it comes in lots of sized, and it is A-MAZING. Seriously, I have made everything from curtains to clothes out of this wonder material...and per yard, it is really inexpensive for fabric!)

and/or

- gardening burlap (I am not much of a gardener, but I am thinking this stuff is supposed to be used to wrap up trees and bushes and such. It comes in rolls that look like bubble tape bubble gum made of burlap. I'm addicted to it and it's cheap enough that I can indulge my addiction)
 
- jute (also know as twine...jute and twine come in lots of sizes but I prefer a medium thickness of jute/twin for this craft) 

Steps:

1| To begin you will need to cut long strips of painter's drop cloth (unless you are doing burlap garland, in which case the burlap is already one long strip). If using painter's drop cloth, I suggest you sew several long strips together to make your garland longer. Take the end of your jute/twine and sew it to the end of you strip. I suggest going over it several times so the end of the jute/twine is really secured to the strip.

2| Next, change your sewing machine to do a wide zig zag stitch. I know this isn't the technical term, mainly because I don't know the technical term, but the goal with this stitch is to sew on either side of the jute/twine. It is VERY IMPORTANT that you don't stitch on the twine because then your garland wont bunch. Now feed your strip through your sewing machine, stitching on either side of the jute/twine right down the middle of your strip.


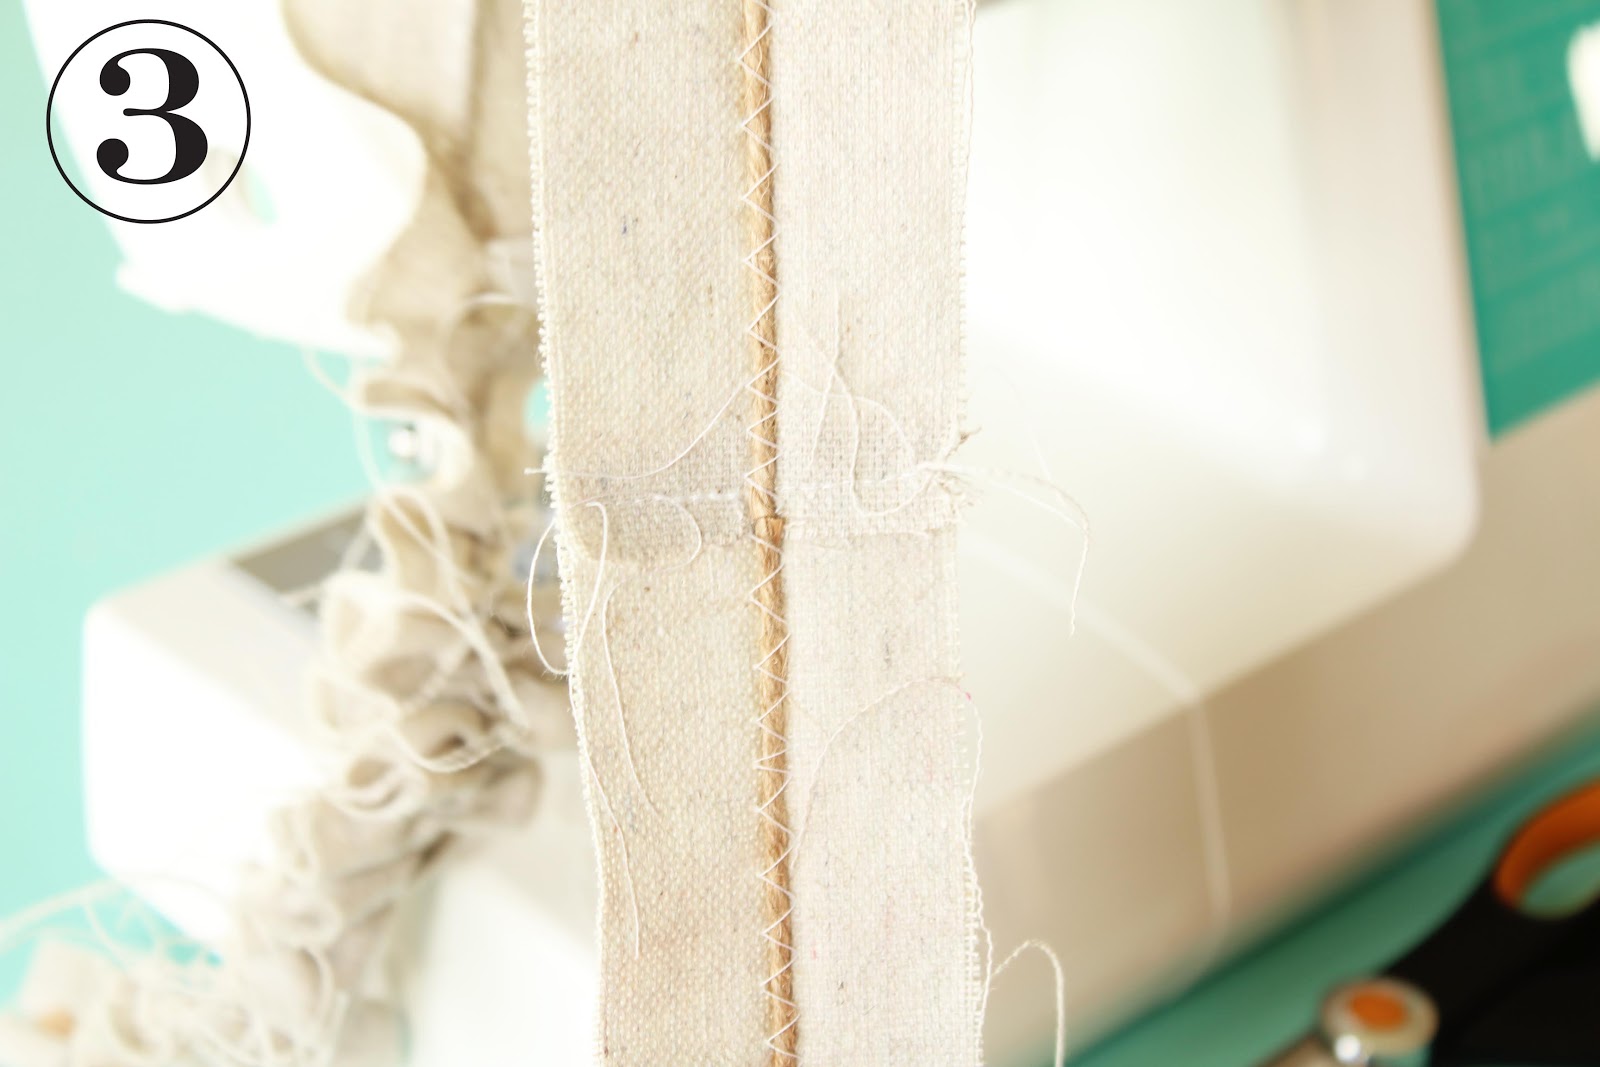
3| As you can see, The jute/twine is zig zag stitched down the middle of the drop cloth strip, but it is not stitched to the strip.


4| Now the fun part. Holding the end of the strip that has the jute/twine securely stitched to it and "scrunch" the strip up the jute/twine, creating a ruffly and scrunchy effect! The zig zag stitch makes it possible for the jute/twine to be pulled away from the strip and this creates the ruffles! Woot woot! A bit of a note here: I would pause with the zig zag sewing every couple feet and scrunch. Then continue zig zag sewing. Pausing to scrunch as you go is way easier than scrunching at the end of sewing an 8 foot strip. Also, your strip can be as scrunchy on not-scrunchy as you want. Make your scrunch yours!


5| After you have scrunched to your heart's content and reached the end of the strip, you must secure the jute/twine end the same way you secured it at the beginning: with a few straight stitches that make sure the jute/twine is going nowhere.
Note: If at any point you make a mistake or happen to zig zag stitch over the jute/twine, don't panic! Simple cut the jute/twine at the place of your mistake, scrunch all unscrunched jute/twine, and then straight stitch the jute/twine you just cut to the strip at the end of the new scrunched area. Then continue with the zig zag stitch. If you run out of jute/twine, just get a new piece and start where you left off!

6| enjoy!!!


Friday, November 9, 2012

Advent Calendar DIY


Hello friends! I start this Home Depot Holiday with a delightful advent calendar! This kind of calendar is really the best kind...it comes with daily treats! Little gifts leading up to the very day of gift giving!

Okay here is the breakdown...

From Home Depot (HD):
- mini terracotta pots (also available at Hobby Lobby)
- magnetic metal sheet (you could also arrange the pots on your fridge!)

From Other:
- Paint (any holiday colors your heart desires)
- Magnets (about the size of a nickle)

Note: Most the stuff for the wreath and garland are from HD as well, but I am doing tutorials on them soon so there you have it :)


1| Start by picking your holiday colors (I chose red and white-inspired by the cutest Christmas candy...candy canes) and paint your mini terracotta pots. One of the best things about working with terracotta is that it soaks up paint very well and dries very fast. 1 coat red and 2 coats white otta work.


 2| Paint on those numbers! It takes a bit of dexterity but I know you can do it! Plus...those little numbers DO NOT have to be perfect...in fact the imperfection of it all it my favorite part! Also, results are inconclusive as to how many days you should have on an advent calendar... 24 or 25? I made 25 because, well, who wants less candy? Not me.


3| Next is the hot glue (second in versatility only to duct tape). Exactly opposite of your painted number place a glob of glue on the outside rim of your pot...


4| and the quickly glue on that magnet that makes the magic happen!


VWELLA! 


I made little burlap sacks to hold peppermint Kisses and added a few mini ornaments, but please feel free to stuff you mini painted pots with whatever your heart desires!